Wednesday, February 08, 2012
Vege oil bus moving and grooving
This cute bus wants to take its own personal band on a tour and looks like they would like a few coins to help them on their journey. Here is their blurble:
"Los Angeles, CA - Hell&Lula, the commanding electro-dance group from Los Angeles, is doing a PledgeMusic Campaign, with goal of the campaign is to raise enough money to modify their "Cool Bus" (a converted school bus) so that it can run on waste vegetable oil from restaurants instead of diesel fuel. PledgeMusic is an online platform that allows fans to fund creative projects....In addition to being influential in a musical way, Hell&Lula is influential in a social way. Adding to their most recent plan of converting their bus to be more eco-friendly, they have also developed a Recycled Merchandise Program, and have helped spread the message of their friends at Falling Whistles, a non-profit organization dedicated to spreading the word about war in the Congo and vying for its peace."
Sounds good. Maybe one day we will see them in reality. To visit them virtually and donate visit here
Sunday, July 26, 2009
mud map to conversion
 Additional notes on the Cardboard:
Quick conversion kit + fuel injector line heater (vege booster heater)
Basically I don't remember much of what it was about except it is one way that they do the conversion , or did, or should do, or something, at vegecars
But, I am still keen, years later, to convert my beast.
Don't give up on me yet!!!
:)
Friday, February 22, 2008
Fifteen: Be inspired by legendary friends
Mr. Praccus, you bought your truck after me, and now you have nearly completed you conversion!
You are a LEGEND. Go the HJ47. Go Ruby. Mr Bruce Handbag wants to sniff your tailpipe!
You can look at some of Praccus' pics here. Looks like he needs a more dedicated house for these indeedy!
Tuesday, January 23, 2007
Fourteen: hear potentially bad news
Rapeseed (Canola) oil used as fuel causes extremely high cancer risk
Yikes! It's only at a research stage right now, but the burning of canola oil in svo engines could be unhealthsome. Other oils did not produce the same result. Didn't say if they were genetically modifed or anything.
Monday, October 30, 2006
Thirteen: keep up the communication
Hi Jo
Just been on your veg oil site. Really great. I am in
the process of converting my HJ45 Troopy. I'm at the
stage of getting a second tank and had a few questions
about yours. Did you use a proper automotive fuel
filler cap and fuel pick up line? If so, where did you
source them? And how did you fit the tank(what kind of
brackets)?
Cheers
Chris
Thursday, June 29, 2006
Twelve: pass on the local knowledge
here is what he has to say:
PlantDrive has a dealer in Australia, he's listed on our site. Steven
Hobbs. He stocks the Vegtherm and the Vormax.
The Vormax has a cyclonic action if flow rate is high enough, and a
sedimenter type function at lower flow rates. All is explained on our
site.
Also we do try to get back on emails within hours, and phone calls in a
day or two. We had put that message on our site at a very busy time.
Here's Steven's site:
www.bebioenergy.com
Edward Beggs B.E.S., M.Sc.
PlantDrive(tm) Products div. of Neoteric Biofuels Inc.
edwardbeggs@plantdrive.com
http://www.PlantDrive.com
510-931-5467
Tuesday, May 02, 2006
Eleven: communicate with the on-line community

I got a great email from Cynthia who has converted her merc to oil. She has a great blog called the Improbability Drive.(great name that hitch-hiker's guide fans will appreciate!)
You can check it out at: http://cynxing.com/ImprobDrive/VegOilHome.html
I asked her:
I have been thinking about buying the same kind of kit that you ended up getting, but
I won't need as much heating gear I don't think, living in Australia, it does not get very cold here, certainally no snow in my neck of the woods!
Any tips with that system?
here is her reply:
Jo - I've had the car running on VegOil for over a year now and 15000+ miles and love it. If I were to do it again I would not buy the "kit" as much as the components. So far the "kits" don't have very good instructions. Makes it hard for the average shade tree mechanic to get the job done. I'm working on a visual easy to understand how to thing
As far as products, the vegtherm is great. that's the in line fuel heating that goes in just before the injectors. I also highly recommend the Vormax double filter system. I don't know how available the big diesel fuel filters are where you are, but they are about $15 USD here and last about 7000 miles. Plus the spinning filter does a great job getting out any water and bits of crud. This means that you can be a little less obsessive about filtering if need be and not be concerned for the health of your system. Plantdrive.com has those two things. I don't know who else sells them. Plantdrive is so-so about customer service. They are not prompt calling back.
Greasel.com has had the best customer service so far and do international sales. Charlie, the owner is an excellent resource. All of the kit makers like it if you do your homework thoroughly first so they don't have to explain the basics. There are a number of forums on the basics. It took me a month or two of intensive research on line to really get it.
I have since moved to California (no snow and pretty warm all the time), and find I feel secure with my system here. You'll need the tank heater and some kind of in-line heater, but you can probably skip the plug in block heater. Depending on where your spare tank is you might be able to skip the insulated heat exchange with the coolant.
What kind of vehicle do you have? Even though it's warm I suggest a two-tank system for safety. I would be happy to help you think through this... another great resource is Dana Linscott who helps people build their own systems. It all depends on how adventurous you feel!
cheers back at ya,
Cynthia
Wednesday, February 01, 2006
Ten: find the on-line community

You will see a new feature in the left hand column. This is a Frappr map. It is a dynamic community map where anyone interested in Vegetable Oil Conversions can put a marker for themselves on the globe.
Add yourself!
I have found a great australian forum for mostly biodiesel but there is also a very informative SVO section. (BioFuels Forum). People posting on this site are in all stages of conversion, with many experiened SVO fans out there offering some really thorough advice. YAY!!!!
Wednesday, January 18, 2006
Nine: look to the specialists
ANYWAY. I just opened the email then, and it is great. It is a link to frybirdwhich is a US company which pre-makes all the bits to convert your car to oil. My next step will be to thouroughly read this site! It is recommended also by Kevin Kelly.
Friday, November 11, 2005
Eight: wallow in frustration
The vege conversion has gone no where since the last post except for afew cofees with Tom where we talk about it.
My problems are...
1. I have no skills or tools to make and install the bits.
2. I don't really understand how it will go together.
It's a block I come across alot in life.. sometimes I wish I was born a boy and/or my father had not died when I was so young, so that I could aquire these skills.
Dear blogreader, do you have any suggestion for me?
Tuesday, July 19, 2005
Seven: Find your parts!
We have all the hoses and joiners located, but the rest where oh where can they be?
So hello universe, where do I start looking for the 3 or 6 port solenoid?
where is the fully awesone fuel filter? What about some kind of thermoswitch which will switch the fuel to the oil tank when it is hot enough? A Tank guage so I know when to refill?
Please click the comments link below if you have any ideas!
Monday, July 18, 2005
Sixth: Check your bits
 Never had much trouble with Mr.Bruce Handbag, the handsome Landcruiser, but he does tend to run a bit hot.. temperature gauge rising with the hills etc. So I figured before I went and made modifications to the radiator line and based the running of my fuel system on the abilities of my radiator, I had better get it checked out.
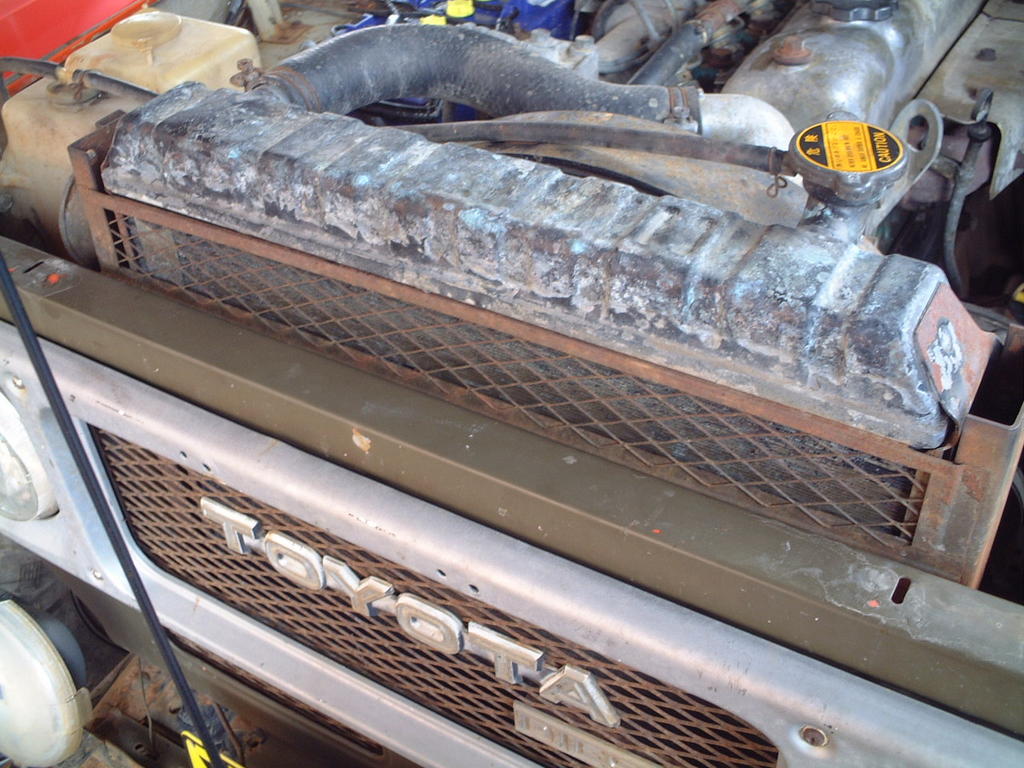
 I went to Natrad, radiator specialists who will test your radiator for free. The guy took one look and shook his head. He showed me the cooling baffle things which you can see are mostly gone or gunked up or damaged. He said I should get another radiator.
 Here is the spiffy new radiator, which ended up costing me $755, which was more than expected because they needed to replace the hoses, thermostat and water pump. They showed me all the old bits which had indeed shot through... just goes to show what a great car Bruce is.. that he trundles along with old radiator and no complaints!
 You can see the difference in the baffles on the new radiator, and the difference when driving is amazing! The next day I drove from Newcastle to Katoomba (3.5hr trip) and we sat on cool pretty much the whole way and went faster too! To see how beautiful the bluemountains are check out the walk we went on at Leigh's Blogsite
The new radiator was all a bit of an expense but I think it is worth it. My mechanic said that Bruce Handbag will run forever so I figure a few good investments here and there are only going to be beneficial in the long run!
Thursday, May 12, 2005
Fifth:start making the real fuel tank

(Tom before coffee)
So today was a long day working on making the real actual tank for Mr. Bruce Handbag. From 11am to 5pm phew!
Tom had a bit of leftover stainless steel which was enough to make the tank from.
I laid the cardboard model out on the metal and traced and measured out the long flat bit which wraps around. Then I traced out one of the ends and got a ruler and measured it all. Then Tom looked at it and pointed out that it was 10mm higher on one end than the other so he re-did that bit and traced round a circular grindy thing to get perfect circle shapes at the ends. Humph how unco/freestyle I am.
Then using a spunky olde fashioned machine which i guess is really a mechanical tin snips that looks more like a spaceship from dune, the bits were cut out of the metal. I even cut one out but yes it was a bit messy!
Then Tom took the two end bits and clamped them together and took them to the grinding wheel and made heaps of sparks grinding away untill they were an exact match.
Next to sort out was the copper hose in the tank, which will have hot water running through it to heat up the tank. The spare copper pipe Tom has was old and not happy about bending any more so we went to
Reece's which is a plumbing supply store.
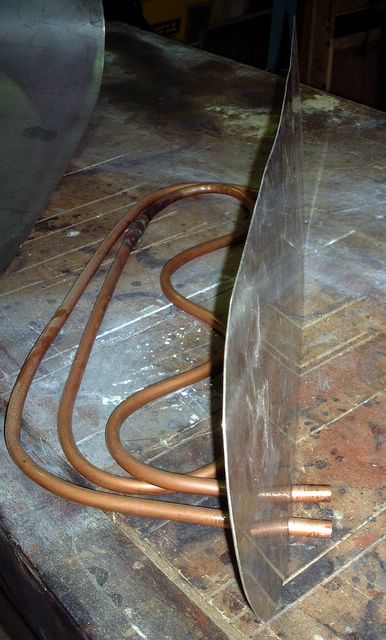
Tank heating coil detail
For my 40L tank we used 3m of Kembla annealed copper pipe which is 15mm diameter and .091mm thick copper that cost $27.94 at Reece's.
Also we bought an internal bending spring for $9.79 this goes inside the copper pipe so you can bend the pipe without squishing it out of shape and making it useless.
And also while we were there we got some Silver Solder Flux for Tom for $15.46. Tom used silver solder to weld the copper to the steel tank.
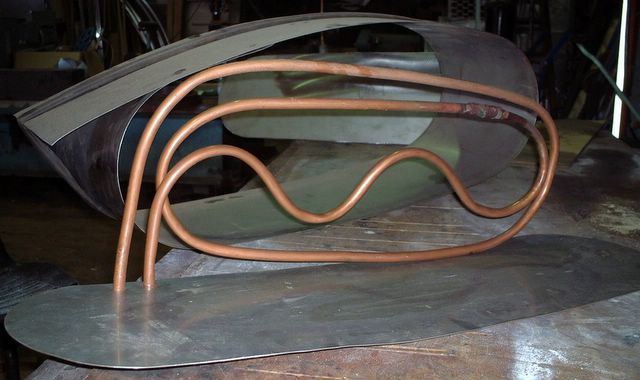
Parts of the tank
SO thats $53.20 spent so far. There is alot of cost which isn't counted there including: Tom's labour, all the fancy equipment in Tom's workshop, the stainless steel sheet, and the bits Tom needed to use like solder stick thingys

assembling tank
Friday, May 06, 2005
Fourth: find a friend who can do tricky work

Tom and his Astro -Turfed Hilux outside his workshop. Don't ask me why he pulled that silly pose. Sandwich the dog is resting in the corner.
So I took the tank model around to Tom's workshop
Tom inspects cardboard tank model
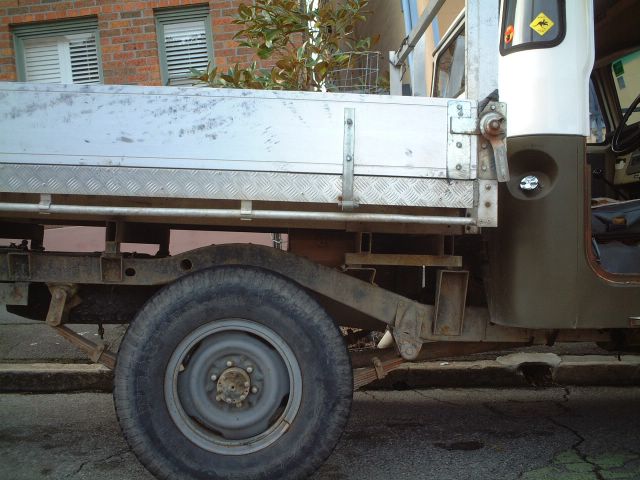
So Tom said "cool" and he will probably use a similar tank in his ute. If you look at the top picture of his ute you can see the spot between the mudflap and the white cab under the tray where his tank might fit in.
So Tom is going to make the tanks using his super powers and supplies he has in the workshop.
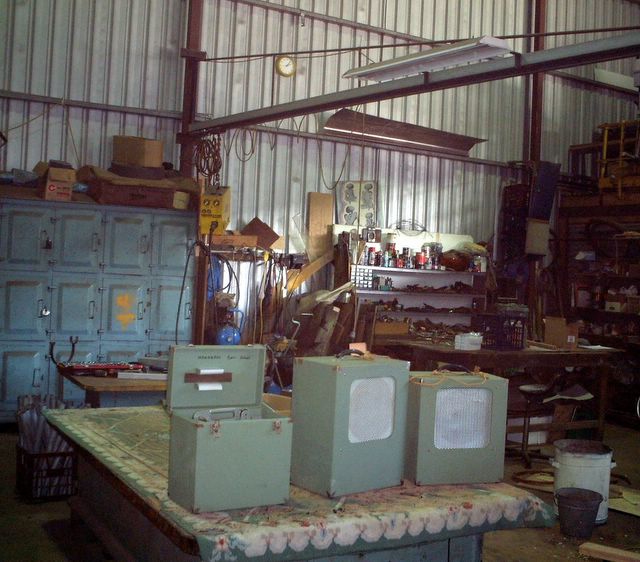
Dog Rough (Tom) Workshop in Carrington
Then we had a look in Tom's fat catalogue from Blackwoods which you can access online:
These guys have solenoids, filters, hi-temp heater hose, polyethelne hose, tee connectors, o-rings, compression nuts, threaded adapters, switches etc.
So we have most stuff sourced. Probably an auto shop will have anythig else we need.
Tom is also thinking about departing from the whole hose within a hose ratiator cooling scheme and using a 12V heated coil around the lines.
That is is homework to investigate.
Wednesday, May 04, 2005
Third: make a cardboard model of your fuel tank
I poked about under mR.Bruce's tray to find a location for my new tank
(to hold the vege oil).
There is lots of room under there for another tank but I had afew things to consider:
1. How far the tank is from the engine. It will be connected with fancy "hose within a hose" lines.. which don't look very cheap.. so the closer the better.
2. How will I fill the tank? For a sticky-outey filler bit, it can't poke out past the tray. I decided between the cab and the tray where there is about 10cm gap.
3. If I am to get the tank under there without pulling the whole tray off (.. possible but tiresome...) I need to be able to manouvre the finished tank into place without undoing any of Bruce.
I found a good place quite close to the front. The dimensions are roughly 65cm x 25cm x25cm, which will allow for about 40L.
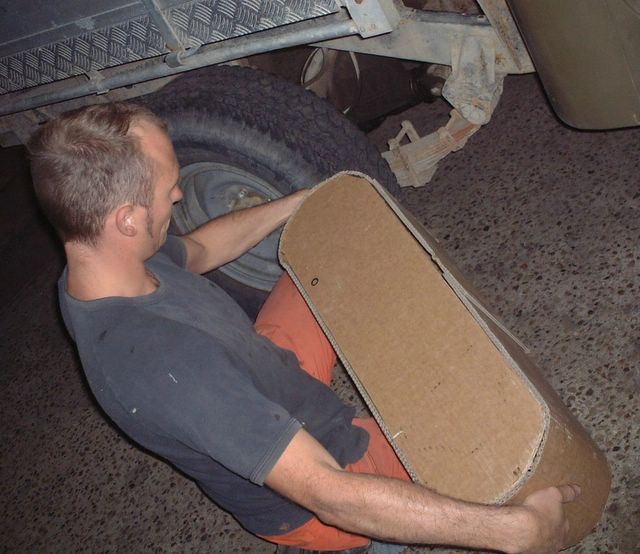
So next I made up a cardboard model:

You can see what I used to make it. The cardboard was a big box my washingmachine came in. First I cut out one of the flat sides, and took it back to Bruce's belly. I had to do that about 3 times before I finally cut it down to the right size. Then I traced an exact copy and cut that out. Then I cut a long strip 25cm high. I painted some PVA glue on the edges of one flat bit and wrapped it around, holding it in place with pins. I kept the other flat bit on with 4 pins only, becasuse I might like to look inside later. I made it with three pieces because that is the most likely way the metal tank will be cut and welded.
Then I took the finished tank to Mr.Bruce and slotted it in. You can see on the side where I have mared for the filler hole to go, and the front where the lines in and out might go. I just put one dot now because I'm not sure how many holes or the location. I am going to visit Tom thisarvo. Then we will find out MORE much MORE!

There it is fitting snugly under the tray. We are yet to see if that "fill me" location is correct. Obviously it needs a bit of pipe that will curl up to the space between the cab and the tray, and have a fuel cap on it.

Standing at the back RH side you can see the model tank in place.
Can you make out the tank above the top RH quadrant of the wheel?
Second: Do some research; read books and serch the web
At some early stage, a bit of RESEARCH is good.
But it can be confusing!
My most helpful things were:
The book by Joshua Tickell "From the Fryer to the Fuel Tank"
The following websites:
- Alternative Technology Association (Australian)
- This Australian scientific reseach paper is very informative
- Journey to Forever
- Vegburner
- Greasel :this informative website is a bit involved in selling its own stuff
I assume you have read some of this stuff or have some idea about the dual tank ( diesel tank/heated vege oil tank) system as I progress in my history.
I am not giving lessons on how to do it, just showing you what I am doing.
First: Buy a diesel Vehicle
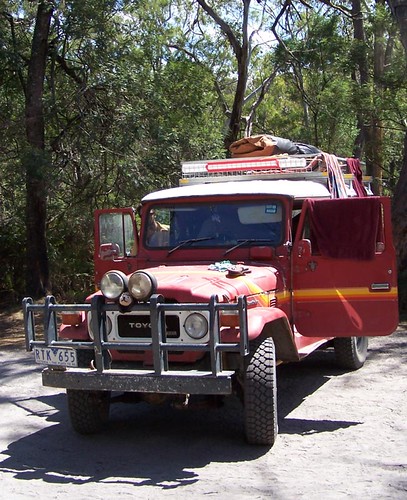
Here is my handsome beast. His name is "Mr.Bruce Handbag".
He is a Toyota Land Cruiser HJ47.
This picture shows him driving to my property near Dungog. Obviously a big Ute like this is good for me. There are much smaller diesel cars available!
This was my first step to running a vege oil vehicle. I took this step about 3 years ago! About time for the second step!

.
![]()
